


Lesson 1 : Python in Houdini
Here you will learn how to use Python in Houdini to create your own scripts that will optimize your workflow.
You will gain a fundamental understanding of Python in Nuke, enabling you to create, connect, and position your own nodes. Of course, we will conclude the course with a practical example
Table of Contents
1. Why use Python in Houdini
2. Getting Started with Python in houdini Scripts
3. First commande
4. Working environment
5. Putting it into practice
6. Sources
1. Why use Python in Houdini
Python is a versatile programming language that is also used as a scripting language in Houdini. It allows for task automation, creation of custom tools, and interaction with the user interface of Houdini.
While VEX exists in Houdini, you won't be doing exactly the same things
with VEX as you would with Python. VEX is specifically designed for
geometry manipulation and excels in geometric operations, whereas
Python is a general-purpose language that can be used for a wide variety
of tasks, including file manipulation, UI creation, and task automation.
The choice between VEX and Python will depend on the specific nature
of the task you want to accomplish in Houdini. Often, both languages
can be used in tandem to leverage their respective strengths.

In this course, you will learn how to create your own nodes, automate tasks, and develop custom scripts that will optimize your workflow, particularly during the node creation process.
2. Getting Started with Python in houdini Scripts
To begin, you'll need to go to the script editor in Houdini to start writing your scripts. In Houdini, there are two ways to write your Python code. You can do it firstly in the Python Shell or in the Python Source Editor.
Python Source Editor

Python Shell

The Python Shell functions more like a console or terminal. You can execute Python code, but it will be done line by line, similar to a console. However, the Python Source Editor will be your main workspace. You can write all your scripts in it and later run your scripts through the Python Shell, and I'll explain why later.
You can see that if we create simple commands in the Python Source Editor and then press 'Apply', the code will run, and we can see the result in the Python Shell.

Now we can start with the first step: importing the Houdini module. To do this, simply write import hou.

If you want to access the documentation provided by Houdini, you can click here.

3. First commande
Now that we know where to write our Houdini scripts, let's start by learning the basics of the different methods provided by the hou module. We will learn how to create nodes, modify their parameters, retrieve information about selected nodes, understand how to navigate the Network view, and then we will see an example of a practical case.
To create a node, we will use the createNode() method and another method called node(). The node() method allows us to retrieve an instance of a node in the Houdini scene using its path.
Then, the createNode() method will allow us to simply create the desired node at the path we obtained using node() just before.

In this example, it's important to understand that first, I'm using the node() method, and as a parameter, I'm providing the path where I want to create my node. Here, we can see that in the Network view, we're in the 'obj' context. 'obj' is a node, the global node in Houdini. Think of the node() method like the file explorer in Windows. If we want to create a file in a specific directory, we need to navigate to that directory first. In Houdini, it's the same concept.
Then, createNode() will simply take as its first parameter the type of node we want to create, and as a second parameter (which is optional), the name we want to give it.
To go back to the node() method, let's imagine we're in a geometry node named 'tata', and we want to create a box. We would use the node() method with the path of where we want to create the node, so 'obj/tata' (a GIF will show you several cases).
Now that we can create nodes, we'd like to be able to set and modify the values inside them. For this, we'll use two methods: parm() and set().
-
parm() allows us to choose which parameter we want to change. It takes the name of the parameter we want to modify as a parameter itself.
-
set() is used to actually modify the value.

If you want to know the name of the parameter, you just need to hover your mouse over the parameter in the Node, and it will tell you in the tooltip at the top. For example, "scale".
For example, we want to change the uniform scale of a cube, and we can adjust it from 1 to 10.


Now, we would like to connect the nodes together to start optimizing our work. To connect nodes, we will use the setInput() method. setInput() takes as its first parameter the number of the input of the node we want to connect. If your node has multiple input branches, the first one will be 0, the second 1, and so on.
Then, as the second parameter, it will take the instance/object of the destination node (we cannot use the name of a node as a string).
For example, if we want to create a box and then a transform, and connect them both. Finally, move them 10 units on the X-axis in the transform node.

If you want to know the name of a node, you just need to go to the node information of the respective node, and you will find the node's name below its label. For instance, "xform".
code for example above

If you want to connect the transform node to an existing or selected node, you'll need another method to retrieve the node instance. If you have selected a node to get the instance, you should use the method hou.selectedNodes(), which returns a tuple.
If you have the precise name of a node, you should use the node() method. This is because you can use this method to retrieve the path of a node, as node() allows you to get an instance of a node in the Houdini scene using its path. Here are both cases as examples.
with the method hou.selectedNodes() with the method node()


From the beginning, in my examples, when I connect nodes, they are placed approximately correctly. However, it's important to know that by default, when nodes are newly created, they overlap.

But we can remedy this by using the setPosition() method to place the nodes where we want. We can also use the position() method to find out the position of a desired node.
setPosition() takes a list of two elements as a parameter, representing the X and Y positions: setPosition([x, y])


4. Working environment
For reasons of practicality, we've used Visual Studio, which can be downloaded here, to enable us to code much faster than using completions.

Unfortunately, in Visual Studio, you won't have the option to use an extension for auto-completion. However, it will still be more useful than Houdini on its own.
To allow Houdini to access your scripts, you'll need to give it access to the folder where your Python script is located. You can do this using the sys module and the sys.path.append(r "c:\your\path\script") method. Assign the path where your script is located to it.

Then, you just need to import the script, and use the reload module. This will allow you to reset your module so that with every save and modification, the changes take effect. This is important because otherwise, you'd have to close and reopen Houdini each time, which can be quite cumbersome.
import sys
sys.path.append(r 'C:\your\path\...\script')
from imp import reload
import your_script as ys
reload(ys)
5. Putting it into practice
In this example, we will demonstrate how to create all the connections and nodes to set up a PyroSolver in a DOPNetwork, while selecting a single node to serve as the source for the Pyro simulation.
To achieve this, we will need to utilize all the methods I explained earlier: the createNode() method, the node() method, the selectedNodes() method, the method for retrieving and setting the position of a node (position(), setPosition()), and, of course, the method for connecting nodes (setInput()).
To begin, we will retrieve the instance of the selected node and then proceed to create all the necessary nodes to generate a PyroSource. Our starting point will be a cube.
That's roughly what the script will do.
source pyro dopnetwork


We will start by creating the PyroSource. This involves creating four nodes and establishing connections between them. Following this, we will proceed with parameter configuration. The initial step is to detect the location of the selected node in order to create the other nodes at the same location. This is crucial because if we attempt the following example, we will encounter an issue since it will indicate that we cannot create another node in the selected mode. (Selecting a geometry node would have worked as it can contain nodes.)

For this, we'll need to work a bit with Houdini's methods. After obtaining the selected node, we can use the path() method to retrieve the node's path.

Once we have the path, we just need to split it using split() to retrieve the preceding node (which is a geometry node in the example). From there, we can create our nodes.
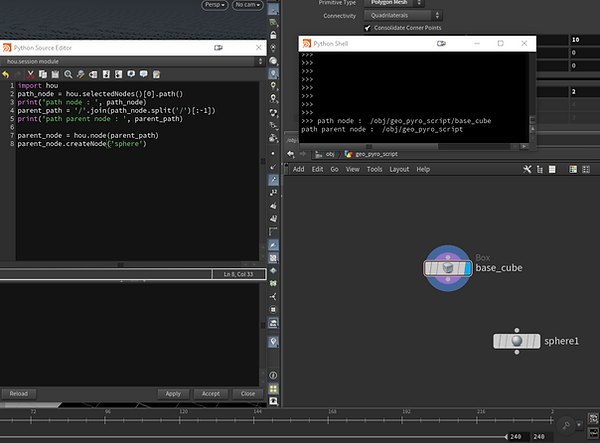
import hou
path_node = hou.selectedNodes()[0].path()
print('path node : ', path_node)
parent_path = '/'.join(path_node.split('/')[:-1])
print('path parent node : ', parent_path)
parent_node = hou.node(parent_path)
parent_node.createNode('sphere')
We retrieve the path of the selected node and split it to get the parent node. Once we have that, we need to transform this text into a node, so we use the node() method to return the instance of the parent node.
Now that we know this, we can create all the nodes needed for the Pyro sources.


Of course, the nodes are not arranged sequentially; they are all connected, but we will organize that using the positioning methods.


Here it is, much better like this. Now, all that's left is to set the parameters for the different nodes.
-
For the PointFromVolume node, change the "Point Separation" to 1 and the "Jitter Scale" to 1.
-
For the Wrangle node, set the VEX expression to @density = 1; @v = {5, 0.5, 0};.
-
For the VolumeRasterize node, set the different attributes (density, v) and enable "Normalize by Clamped" (True).
code for the PyroSource
import hou
#take parent Node-------
node_sel = hou.selectedNodes()[0]
path_node = node_sel.path()
parent_path = '/'.join(path_node.split('/')[:-1])
parent_node = hou.node(parent_path)
#create Node-----------
pointsVolume = parent_node.createNode('pointsfromvolume')
wrangle = parent_node.createNode('attribwrangle')
volumeAttr = parent_node.createNode('volumerasterizeattributes')
null = parent_node.createNode('null')
#connection-------------
pointsVolume.setInput(0, node_sel)
wrangle.setInput(0, pointsVolume)
volumeAttr.setInput(0, wrangle)
null.setInput(0, volumeAttr)
#set position-----------
position_node_sel = node_sel.position()
position_node_selX = position_node_sel[0]
position_node_selY = position_node_sel[1]
pointsVolume.setPosition([position_node_selX, position_node_selY - 1])
wrangle.setPosition([position_node_selX, position_node_selY - 2])
volumeAttr.setPosition([position_node_selX, position_node_selY - 3])
null.setPosition([position_node_selX, position_node_selY - 4])
#parmset----------------
pointsVolume.parm('particlesep').set('1')
pointsVolume.parm('jitterscale').set('1')
wrangle.parm('snippet').set('@density = 1; @v = {5, 0.5, 0};')
volumeAttr.parm('attributes').set('density v')
volumeAttr.parm('normalize').set(True)
There you go, the PyroSources is now complete. We can move on to the dopnetwork. It's going to be almost the same process. We just need to create nodes and make connections. To create the dopNet, we'll keep the step that allows us to detect the parent node. From there, we'll create our dopNet and all the connections and nodes inside.

There you go, with this little piece of code, we were able to create our dopNet and all the nodes inside. Of course, now we'll connect them and position them correctly to avoid overlapping as shown above.


With this, we encounter a small problem. We can't connect the "output" because we don't have the node in question when the dopNet is created. There is an "output" node inside it right away. At no point do we have an instance of this node. But what we can do is retrieve the path of the dopNet with the path() method. We add the child "output" in the path and then transform it into a node with the node() method. This is similar to what we did to retrieve the parent of the selected node, but in reverse: now we're doing it for the child. Then we can connect it.


Now, all that's left is to set up the volume source and the smoke object, and everything will be good. For the volume source, we'll add two operations: one to get the density, and another to capture the velocity.
In the source volume and target field, we'll use (density) for both.
And for the smoke object, we'll set the size and center to (20, 20, 20) and (0, 10, 0) respectively.

In this code, parmTuple('size') allows us to manipulate all three parameters (sizex, sizey, sizez) in a single operation. The set method takes a tuple of three values to set the dimensions for x, y, and z respectively. The same applies to parmTuple('t').
code for the dopnet
import hou
#take parent Node-------
node_sel = hou.selectedNodes()[0]
path_node = node_sel.path()
parent_path = '/'.join(path_node.split('/')[:-1])
parent_node = hou.node(parent_path)
#create Node------------
DopNet = parent_node.createNode('dopnet')
Gravity = DopNet.createNode('gravity')
PyroSolver = DopNet.createNode('pyrosolver::2.0')
SmokeSolver = DopNet.createNode('smokeobject')
volume = DopNet.createNode('volumesource')
#conection--------------
PyroSolver.setInput(0, SmokeSolver)
PyroSolver.setInput(4, volume)
Gravity.setInput(0, PyroSolver)
#get child -------------
path_dopnet = DopNet.path()
path_child = path_dopnet + '/output'
node_child = hou.node(path_child)
#connect child----------
node_child.setInput(0, Gravity)
#position---------------
Gravity.setPosition([0, 1])
PyroSolver.setPosition([0, 2])
SmokeSolver.setPosition([-1.5, 3])
volume.setPosition([1.5, 3])
#parm-------------------
SmokeObject.parmTuple('size').set((20, 20, 20))
SmokeObject.parmTuple('t').set((0, 10, 0))
volume.parm('numvolumes').set('2')
volume.parm('volume1').set('density')
volume.parm('vfield1').set('density')
volume.parm('volume2').set('v')
volume.parm('vfield2').set('vel')
Now all that's left is to merge the two pieces of script we've created so far. With a single click, we'll have our PyroSolver system ready to go. We'll add a few lines of code to position the dopnet correctly after the notes for the PyroSources, set a
parameter in the volumeSource to retrieve the output from the PyroSources, and we'll be all set.
We just need to get the position of the selected node in x and y, and retrieve the path of the null node we created for the PyroSource.

all code
import hou
#take parent Node-------
node_sel = hou.selectedNodes()[0]
path_node = node_sel.path()
parent_path = '/'.join(path_node.split('/')[:-1])
parent_node = hou.node(parent_path)
def create_PyroSource():
#create Node-----------
pointsVolume = parent_node.createNode('pointsfromvolume')
wrangle = parent_node.createNode('attribwrangle')
volumeAttr = parent_node.createNode('volumerasterizeattributes')
null = parent_node.createNode('null')
#connection-------------
pointsVolume.setInput(0, node_sel)
wrangle.setInput(0, pointsVolume)
volumeAttr.setInput(0, wrangle)
null.setInput(0, volumeAttr)
#set position-----------
position_node_sel = node_sel.position()
position_node_selX = position_node_sel[0]
position_node_selY = position_node_sel[1]
pointsVolume.setPosition([position_node_selX, position_node_selY - 1])
wrangle.setPosition([position_node_selX, position_node_selY - 2])
volumeAttr.setPosition([position_node_selX, position_node_selY - 3])
null.setPosition([position_node_selX, position_node_selY - 4])
#parmset----------------
pointsVolume.parm('particlesep').set('1')
pointsVolume.parm('jitterscale').set('1')
wrangle.parm('snippet').set('@density = 1; @v = {5, 0.5, 0};')
volumeAttr.parm('attributes').set('density v')
volumeAttr.parm('normalize').set(True)
create_dopet(position_node_selX, position_node_selY, null)
def create_dopet(position_node_selX, position_node_selY, null):
#create Node------------
DopNet = parent_node.createNode('dopnet')
Gravity = DopNet.createNode('gravity')
PyroSolver = DopNet.createNode('pyrosolver::2.0')
SmokeSolver = DopNet.createNode('smokeobject')
volume = DopNet.createNode('volumesource')
#conection--------------
PyroSolver.setInput(0, SmokeSolver)
PyroSolver.setInput(4, volume)
Gravity.setInput(0, PyroSolver)
#get child -------------
path_dopnet = DopNet.path()
path_child = path_dopnet + '/output'
node_child = hou.node(path_child)
#connect child----------
node_child.setInput(0, Gravity)
#position---------------
Gravity.setPosition([0, 1])
PyroSolver.setPosition([0, 2])
SmokeSolver.setPosition([-1.5, 3])
volume.setPosition([1.5, 3])
#parm-------------------
SmokeObject.parmTuple('size').set((20, 20, 20))
SmokeObject.parmTuple('t').set((0, 10, 0))
volume.parm('numvolumes').set('2')
volume.parm('volume1').set('density')
volume.parm('vfield1').set('density')
volume.parm('volume2').set('v')
volume.parm('vfield2').set('vel')
#parm sop path and pos dopnet------------
DopNet.setPosition([position_node_selX, position_node_selY - 5])
volume.parm('soppath').set(null.path())
create_PyroSource()
We have completed the practical application through this course. Now, you are capable of managing all nodes, creating parameters, modifying settings, and positioning elements as needed. This empowers you to accomplish a wide range of tasks in Houdini, optimizing your workflow and making tasks more efficient.
While it may take a few lines of code to create certain things, the time invested in scripting will pay off significantly in terms of time saved. Moreover, you have the advantage of customizing your scripts to suit your preferences, enabling you to work swiftly. You can even create multiple scripts tailored for different scenarios, allowing you to generate various elements in a matter of seconds.
I hope this lesson has served you well !
6. Sources
https://fr.wikipedia.org/wiki/Python_(langage)
https://code.visualstudio.com/
https://www.autodesk.fr/products/maya/overview?term=1-YEAR&tab=subscription
https://www.autodesk.com/support/technical/article/caas/tsarticles/ts/lC3jaffqnWFyQoLPEPm7n.html
https://docs.python.org/fr/3/tutorial/
https://www.sidefx.com/
Images
https://code.visualstudio.com/
https://www.autodesk.fr/products/maya/overview?term=1-YEAR&tab=subscription