


Cave Academy Set up
Lesson 2 : Texture and Shading
Texturing/Shading involves giving a visual identity to a surface by applying textures, colors, and details, while shading determines how light interacts with this surface, thus influencing its appearance, reflectivity, roughness, and other visual characteristics. Together, they open up an infinite palette of possibilities to convey narratives, emotions, and environments in the world of digital creation.
Table of Contents
1. Texture and shading
2. Texturing bases in Substance Painter
3. Texturing bases in Mari
4. Node Graph
5. Useful nodes
6. Sources
1. Texture and shading
Texturing and shading in Maya are crucial stages in bringing 3D models to life by adding details, colors, textures, and realistic visual properties. Here's an overview of these processes:

Cave Academy set up
Texturing: Texturing involves applying images or procedures to give visual characteristics to a 3D object's surface. This includes applying textures such as color images, bump maps, specular maps, or displacement maps.
UV Mapping: Before texturing, it's essential to define the object's UV mapping, which is the projection of its surface into two dimensions to properly apply textures. This often involves unfolding the geometry into a 2D form to facilitate texture application.

Here's Maya's interface for UVs. It's important to "delete history" and "freeze transformations" on the object and group before starting with the UVs. You'll find Maya shortcuts in the Poly Modeling shelf.

Delete History Freeze transform

The tools highlighted in red are the ones we use the most: "Cut" allows cutting selected edges (in edge selection mode), "Unfold" flattens the cut UVs, "Orient Shells" aligns the UVs to optimize them in space, and "Layout" arranges the UVs in the desired number of squares.
Shading: Shading refers to how the surface reacts to light. This involves applying materials and visual properties to create effects such as glossiness, roughness, transparency, etc. in a render.
Nodes and Shading Networks: Maya utilizes nodes and shading networks to connect textures, materials, and visual effects. These networks enable the combination of different texture layers, control over how light interacts with the surface, and the creation of complex visual effects. The Hypershade Editor, Maya's primary tool for working with materials, textures, and shading nodes, allows for intuitive creation, editing, and visualization of shading networks.

Hypershade Localisation

By skillfully combining texturing with shading, 3D artists can give a realistic and detailed appearance to models, controlling how light interacts with their surfaces to produce compelling renders.
2. Texturing bases in Substance Painter
Substance Painter is a powerful and popular 3D texturing software used by artists to create high-quality textures for 3D models. Here are some key points to know about Substance Painter:

Texture Painting Workflow: Substance Painter offers a non-destructive texture painting workflow that allows artists to create professional-grade textures directly on 3D models. It uses a layer-based painting approach, similar to how artists work in image editing software.
PBR Painting (Physically-Based Rendering): It's optimized for PBR rendering, providing compatibility with modern rendering engines. This means that textures created in Substance Painter are designed to faithfully replicate material behavior in realistic 3D environments.
Layer and Mask System: Substance Painter utilizes layers and masks, enabling artists to overlay and combine different textures and effects in a non-destructive manner. This provides great flexibility for experimenting and adjusting textures without altering the original data.
Procedural Painting and Smart Materials: In addition to manual painting, Substance Painter offers procedural painting options where smart materials can be applied to generate realistic effects with a single click.
Real-Time Preview: Substance Painter's interface allows real-time preview of textures applied to the 3D model, providing immediate visual feedback during the creation process.
Texture Export: Upon creating textures, Substance Painter offers flexible export options for various game engines, 3D modeling software, or rendering engines.
Substance Painter is an advanced and user-friendly tool for creating highly detailed textures, offering a wide variety of tools and features for 3D artists to produce professional and realistic results.
Tutorial Substance
We'll see in a tutorial how to properly set up Substance scenes and import textures. Here's the mesh we'll be texturing. First of all, assigning a material to the mesh and properly setting up its UVs are crucial.


Here is the mesh with a neutral pxr surface.
We will export the mesh as OBJ or FBX. If you don't have this feature in your exports, remember to activate the plugin (Windows => Settings/Preferences => Plugin Manager).


In Substance, we'll apply these settings to import our OBJ file or FBX file.
To import the OBJ/FBX, we need to set its parameters:
- Select your OBJ/FBX in Select Button
- We can keep the default PBR mode, we won't have any SSS (subsurface scattering) in this piece. We'll work with scattering settings in the pxr surface under shading.
- We'll set a 4K resolution
- Ensure to keep the created UVs (this is important, otherwise Substance won't import the mesh's UVs).

You need to BAKE the textures before starting to paint; otherwise, Substance won't apply the correct calculations. In this window, you can choose the size of the textures you're going to create, the amount of information and maps you want (if you don't want a Normal map, simply uncheck it). This way, your mesh will be ready to be painted.
For baking, you can click on this small crescent icon or access it through the Texture Set Settings menu.

You will see this Texture List if you have multiple different materials. Here, we only have a single material (1 PXR surface)

The power of Substance lies in its ability to quickly create realistic materials such as metal, plastic, leather, and more. You have access to numerous pre-developed materials to provide a strong foundation for your work. Additionally, you can create your own materials using smart materials and the alpha mask system.
In our shop clic here, you'll find packs of smart materials that we've developed to complement your collection.

If we analyze the texture of a Lego, we notice:
- a strong specular
- small dust particles
- low roughness
- a strong color saturation
- scattering
References

Here, to start the texture, I often use a base of a smart material. I hide all the layers and adjust them one by one to achieve something good and coherent. Here, we'll first adjust the base color. This LEGO material is quite simple to make. Using the parameters, right-click on the viewport to access the base color, roughness, metallic, height... You can change them by adding more black or white.


Here, I can put the color I want for my base color, roughness, height, etc... I can truly customize my material as I wish. If I don't want any roughness, for example, I just need to deactivate it. Substance is very flexible.
Since a LEGO is quite reflective, I'll lower its roughness to have beautiful reflections (0.842) and give it a more yellowish color, less orange.

Now that our base color is set, we can add some small details of dirt. We activate the dirt and dust layers. We add a paint layer after the dust mask to paint the areas where we want or don't want dirt. To add a mask, you can click on the small magic wand icon (left click) and select paint. To choose your brush, you can go to alpha (right-click, viewport, paint selection) where you'll find plenty of brushes. You can also import your own brushes.


You can view one channel at a time with this tool. It's quite useful !
The complexity of Substance lies in managing masks, transitions. Often, we play with many layers and effects to achieve realistic materials. We can take the example of Axis Studio for Love, Death & Robots, for instance; their workflow is very interesting.

Mask Editor
Axis Studio for Netflix production "Love Death and Robots"
Article by Axis Studio click here
Result Lookdev :


Substance Scene :


As you can see, there are a lot of grouped layers to create each small detail for a realistic look development. It's a good example of presenting Substance's workflow in a studio setting. We'll delve into the workflow for a realistic asset in the article focusing on the helmet's look development.
Export your maps in Substance Painter

The export in Substance is quite standard, it's important to choose for which type of workflow these textures are intended (PXR Surface for us here).
3. Texturing bases in Mari
What is Mari ?
Mari, developed by Foundry, is a high-end 3D painting and texturing software used in the film, video game, and visual effects industries. Here are some key points:
-
Advanced Painting and Texturing: Mari provides powerful tools to paint directly onto complex 3D models, allowing for precise creation of detailed textures.
-
Non-Destructive Texture Management: It uses a layer-based system similar to image editing software, enabling non-destructive modifications to textures.
-
High-Resolution Support: It excels in handling very high-resolution textures, crucial for productions requiring intricate details.
-
Projection Workflow: Mari offers advanced projection tools to apply textures to complex surfaces, making it easier to work on models with intricate details.
-
Advanced Data Handling: It efficiently manages large amounts of texture data and allows for organizing and handling complex texture sets.
-
Compatibility with Other Software: Mari is often used in conjunction with other 3D software such as Maya, 3ds Max, or Houdini, enabling a smooth workflow between these applications.
Mari has a good understanding of displacement, while Substance struggles more to create good displacement maps. Often, we switch between the two software for this reason.
The difference with Substance is that Mari is node-based; it operates using nodes, unlike Adobe Substance Painter, which is more similar to Photoshop. Mari is more powerful than Substance in the sense that it can support many more UDIMs and create maps of better quality (16K).
Mari Interface

In Mari, importing your mesh is similar to Substance. Mari's material is called BRDF (Bidirectional Reflectance Distribution Function), where you'll connect all your maps (base color, specular, roughness, etc.) to create your texture.


You can choose all the maps you want to create for your texturing.

By validating your new scene, it will automatically create a pre-made material. We recommend doing it manually to understand how Mari's node graph workflow operates. So, you have enough channels that you've chosen to create. Here, we have Base Color, Specular, Roughness, and Bump. The merges will connect to the mask that we'll paint to create the different desired textures.
Don't forget to check Foundry's documentation on Mari, it will be very useful to you : https://learn.foundry.com/mari/Content/reference_guide/shader_parameters/brdf.html


In the material, we can adjust what we want; it's quite similar to Pixar Surface in RenderMan or AiStandardSurface in Arnold. We adjust it in the same way.
The baking process in Mari is different the mesh is ready to be painted upon import. However, when painting, you can either bake after each action or activate automatic baking. It's automatically set on auto-bake, but you can switch it to manual. I recommend the manual mode, because it's easier to use, you choose when to bake when you're happy with your work.

It's important to work with the Color node, you can set a color before creating various masks to enhance your texturing with paint. For instance, here, I've applied yellow to my base color node and adjusted the settings to achieve high roughness (color =white), allowing me to paint more specular areas (color = black) as desired within the paint. Mari operates this way, and it's fairly easy to get the hang of, especially if you're already familiar with software like Nuke. Get into the habit of working with masks. You'll find some shortcuts, like pressing one of the numeric keypad keys to display different selections in the viewport.
Here it's a little example for understand the main workflow :
Base Color


Color 1 => Merge Base
Color 2 => Merge Over
Selection Tool
The selection tool is very useful as it has several modes: edge selection, face, mesh, and others. It's highly beneficial for precise selections. Here, I'm using it to create my mask. We recommend switching to face mode when using the selection tool.

Selection Tool

Face mode

Right Click for create a White Fill selection in the Paint (mask)

Paint (mask) for the Base Color Paint => Merge Mask

The BRDF material's result fir the Base Color.
Specular
For the specular, it's the same process, the same procedure

Specular Channel viewer (Color), I've applied a constant black for the roughness, indicating that there's a lot.

Specular Channel viewer (Mask for add variation), Here, I'm painting in white to create an alpha to indicate: here I want more specular.

Here, we're viewing the BRDF material's result.
Bump
For the bump, it's the same as what we know in Maya's Hypershade. You work with procedural maps or create your own to add volume.

Working in Mari is similar to Substance; it involves working extensively with masks and alpha maps to create dirt and bring materials to life. You can import your own maps (in Image Manager) and have complete freedom in adjusting all parameters, but there are no smart materials or pre-made settings. It's up to you to do the entire job.
Here, the texture has been imported into the image manager, so the roughness will have this pattern. We often create our alpha in Photoshop and then import it afterward.


The Teleport nodes is very important because quickly you will have graph very heavy, they are designed to help declutter your node graph by transmitting data through hidden connections. Any node can be plugged into a teleport sender's input, which is then transmitted to one or multiple teleport receiver nodes, even from nested groups and materials
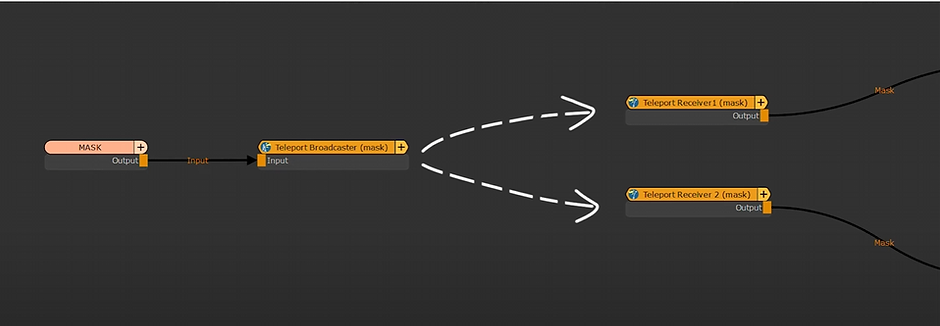
Here, I'm transferring the data from my mask into the merge mask, which helps me keep a clean and understandable graph. You can also add backdrops to make your graph more readable.

This video from the Mari documentation explains in detail the role of these nodes :
Keyboard shortcuts
P = Brush
B = Bake
Ctrl+Shift+B = Bake and Clear
Shift = Move texture projection
Control + R = Rotate Control
Click + Shift = Scale image
Ctrl+R = Spin
Alt+Shift = Pan
F = Focus
Shift+I = Invert Mask
L = PopUp Image Manager
K = PopUp Shelf
J = Popup Color Picker
W = Rotation
Alt+Ctrl+Left button = Zoom
Ctrl+A = Select All
Ctrl+E = Select None
Ctrl+I = Invert
Ctrl+D = Clear Marquee Selection
The material node is very important and useful in the texturing workflow. The material node allows you to texture with a material-based workflow. Instead of texturing your individual texture channels one at a time, you define an entire material at once, then merge several of them together to quickly create all your texture maps. You can mix several materials together using the multi-channel node, which lets you create masks.
Not only does this speed up your workflow, but the ability to share, import and export materials enhances the productivity of multiple texture artists.
You can find a free template on mari in the shop. with stik notes to explain how this workflow works.

press on the node with ctrl and left-click twice to open the node

FreeTemplate Mari

Inside the node material with all the channels available to create your own material
4. Node Graph
We will see how to connect the exported maps from a texturing software for more details. I'll direct you to my lesson on Pxr surface/Pxr layer click here. Here, we will only cover Pxr surface and AiStandardSurface.
Pxr Surface (Renderman by Pixar)

Base Color map
Face Color map
Roughness map
Normal map
Displace map
The difference between RGB branches and RGBR, RGBG, and RGBB branches in a RenderMan PxrTexture (same for Arnold Worlflow) refers to the color channels used for texture mapping.
-
RGB: This is the most basic form where you have the Red, Green, and Blue channels.
-
RGBR: This configuration uses the Red channel twice, meaning the Red color channel is duplicated.
-
RGBG: Here, Red is followed by Green, then Blue, and then Green again. This shows an alternating pattern between Red and Green channels.
-
RGBB: Similar to RGBG, except instead of returning to the Red channel after Blue, it uses Blue again.
Each configuration has its own potential uses in terms of creating specific patterns or textures. For example, using a specific color channel more than once can affect how a texture is applied or how it interacts with geometry in a scene. It can also influence how color channels are blended or manipulated by other nodes in the texture network.
For example, for Base color and Face color maps, we use RGB because they are generally in color. Whereas Roughness and Displacement maps are in black and white, so we need a single-color channel.


Shading part
The shading section in Hypershade is where you can see and manipulate the connections between different textures and nodes used to create the material for an object in rendering software like Maya.
Once you've connected all your textures in Hypershade, the shading section becomes important to visualize and manage how these textures interact to define the visual properties of your object, such as its color, roughness, and more.
In this section, you'll likely see nodes representing the textures you've connected. By selecting them, you can view their properties in the editor's parameters, and by linking these textures to other nodes (like mixers, value controllers, shaders, etc.), you define how these textures interact to create the final appearance of your object.
Hypershade often provides visual views of nodes and their connections, making it easier to manipulate textures and understand how they contribute to the overall rendering of your scene. You can also adjust the properties of individual nodes to modify how textures are combined or interpreted by the rendering engine.

Here you'll find all the possible parameters to create your overall shading: managing specular, roughness, etc., without needing to adjust your maps. For the maps, you can handle them individually using nodes like HSL, Remap, and others that we'll explore in the Useful Node section.
Main Parameters

The Diffuse Color parameter in Pixar's PxrSurface refers to the base color of a material, the color that is uniformly scattered in all directions on the surface without specular highlights. It's the fundamental color of the material without considering reflection or glossiness effects. This parameter defines the base color of the material. You can choose a specific color by setting RGB values (Red, Green, Blue) or by using a texture to influence the diffuse color. When a texture is used, it alters the base color of the material based on the provided texture information.
The gain designates the rate of diffuse contribution in the material's result. If it's at 1 = 100%, if it's 0 = 0%, and if it's 0.5 = 50%.


The Primary Specular refers to the main component of specular reflections on a surface. In the context of 3D rendering and shaders like Pixar's PxrSurface, it represents the primary component of shiny or specular reflections on a material.
This parameter controls the strength and intensity of the primary specular reflections, which are the direct reflections from the light source.
It determines the sharpness, brightness, and concentration of these reflections on an object's surface. By adjusting the Primary Specular, you can influence how light directly reflects off the material, creating either strong, concentrated highlights or softer, broader reflections. Like many parameters, there's an 'artistic mode' (freely chosen values) and a 'physical mode' (physically accurate values based on the material's real reflection properties)


The Rough Specular parameter controls the roughness of specular reflections on a surface. In shaders like Pixar's PxrSurface, this parameter influences the diffusion and spread of light reflections, determining the sharpness or softness of specular highlights.
A high value of Rough Specular creates a rougher surface with blurred and extended reflections. This often simulates more matte materials or textured surfaces that scatter light in a more diffuse manner, resulting in softer and less concentrated reflections.
Conversely, a low value of Rough Specular generates sharper and more concentrated reflections, characteristic of smooth and glossy surfaces like polished metal or smooth glass.
Adjusting this parameter allows for control over how light reflects on the material's surface, significantly impacting the overall appearance of the material in a 3D scene. It influences the perception of surface glossiness and texture, contributing to the creation of more realistic and diverse materials in renderings.


Clear Coat simulates a layer of clear coating or varnish applied atop a material. This additional layer replicates the appearance of a protective coating, often used to add glossiness or protection to an object's surface.
This parameter controls the intensity and visual effect of the clear coating. By increasing the "Clear Coat" value, you enhance the effect of this additional layer, creating extra reflections and boosting the surface's shine. This can produce highly glossy varnish-like effects or highly reflective finishes on the material.
"Clear Coat" is commonly used to simulate materials such as varnish, glass with a protective coating, or glossy, smooth surfaces that have an additional layer of shine.

The Subsurface Scattering (SSS) simulates the phenomenon of light diffusion through translucent or semi-transparent materials. This technique replicates how light penetrates through a material and scatters, creating a subtle, soft glow effect on the surface.
By adjusting the SSS parameters, you control how light travels through the material. This is particularly useful for organic materials like human skin, wax, or other semi-transparent substances, as it adds a dimension of realism by replicating how light interacts with these materials.
You can adjust settings such as the SSS color to determine the hue of the light diffused through the material, the diffusion distance to control how deeply light penetrates, and other parameters that influence how light spreads through the material.There are several modes in the SSS.

The Glass is used to simulate glass surfaces or transparent materials in a 3D scene. This parameter is utilized to define the transparency and refractive properties of a material, thereby simulating characteristics of glass or other transparent surfaces.
By adjusting the parameters of Glass, you can control aspects such as the index of refraction, which determines how light is bent when passing through the material, along with the color and transparency of the simulated glass.
In the PxrTexture/PxrLayer lesson, we will delve into the details of each parameter's purpose and function.
5. Useful nodes
The Remap: The Remap (Remap Value) is a node used to adjust or reconfigure the values within a data range. It allows you to remap or modify input values to output values based on a curve, equation, or user-defined values. This provides precise control over how data is transformed or distributed, often used to modify attributes such as color, transparency, brightness, or other parameters in a 3D scene.


HSL: HSL (Hue, Saturation, Lightness) is a color model often used in graphic design, image editing, and computer graphics. It describes colors in terms of their hue (the type of color), saturation (the intensity or purity of the color), and lightness (the brightness of the color).
-
Hue: Represents the type of color, ranging from red to orange, yellow, green, blue, purple, etc., essentially the different colors in the spectrum.
-
Saturation: Defines the intensity or purity of the color. Higher saturation means the color is more vibrant, while lower saturation tends towards a grayscale or more muted color.
-
Lightness: Determines how bright or dark the color is. Increasing the lightness moves towards lighter shades, while decreasing it moves towards darker shades.
Using HSL allows for more intuitive control over colors compared to other models like RGB or CMYK, especially when adjusting color variations, tones, or shades.


2D Manifold : The Manifold 2D in Maya is a modeling tool used to apply textures to 2D geometries. It defines how a texture will be mapped onto a surface using UV coordinates (2D) to determine how the texture extends across the object.
This tool offers various projection modes to apply the texture, such as planar, cylindrical, spherical, etc. It also allows manipulation of UVs to precisely adjust how the texture is positioned, rotated, or scaled on the object's surface.
By using the Manifold 2D, artists can more precisely control how textures are applied to models, which is crucial for achieving realistic and accurate visual rendering in the field of 3D modeling.


Color Correct: The Color Correct is a node used to adjust and manipulate the colors of textures or images. It offers various parameters to modify color characteristics such as brightness, contrast, hue, saturation, and other color adjustments.
This node enables precise color corrections, including color balancing, tone adjustments, altering brightness and contrast levels, as well as applying specific color filters.
By using the Color Correct node, artists can fine-tune and adjust textures or images to achieve the desired visual appearance in their 3D modeling or animation projects. It provides a range of useful tools to enhance the quality and aesthetics of visual elements.


Clamp: The Clamp is a node used to limit or restrict the values of an input to a defined interval. It allows defining a range of allowed values for the input data, thereby constraining values that exceed this interval.
For instance, if you have brightness values ranging from 0 to 1 and use the Clamp node with a range of 0 to 0.5, any values exceeding 0.5 will be "clamped" or fixed to the defined maximum value, in this case, 0.5.
The Clamp node is often used to ensure values stay within specific bounds, which can be helpful in various scenarios such as managing color data, manipulating displacement values, rotation, or any other attribute where precise limits are necessary.

Fractal and Noise: The Fractal and Noise nodes are texture generators used to create patterns or random and organic variations.
-
Fractal: This node generates complex patterns using mathematical algorithms, often producing repetitive and intricate patterns. It's useful for creating natural textures like terrains, clouds, organic patterns, or turbulence effects.
-
Noise: The Noise node generates controllable random variations. It creates variations of random values based on noise algorithms. It's often used to add detail to an existing texture, create rough or grainy textures, or simulate natural irregularities such as grain or random textures.
These two nodes are extensively used in creating textures, shaders, or generating various visual effects within Maya's 3D scenes, providing precise control over pattern creation and visual variations.


I hope this lesson has served you well !